Documentation Index
Fetch the complete documentation index at: https://www.klavis.ai/docs/llms.txt
Use this file to discover all available pages before exploring further.
Prerequisites
- Salesforce account (personal or business)
- Access to Salesforce Developer Portal
Step 1: Create Salesforce Developer Account
- Visit https://developer.salesforce.com/
- Click “Sign Up” or “Login” if you already have an account
- Sign in with your Salesforce account or create a new developer account
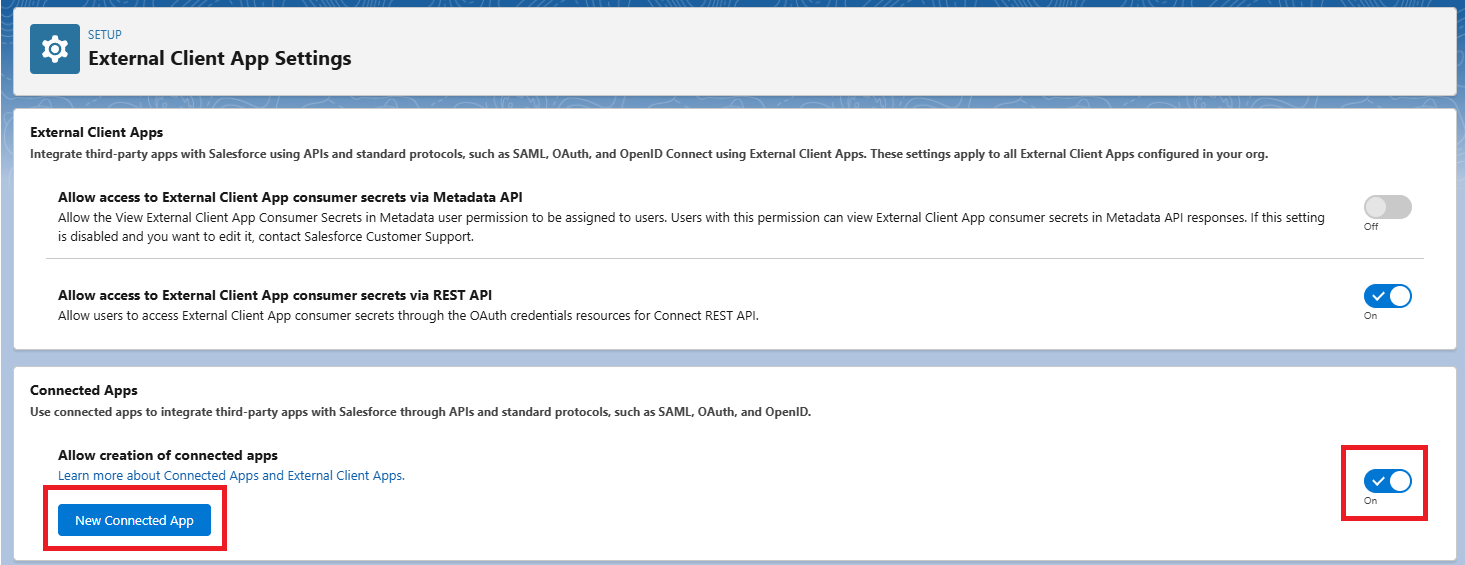
Step 2: Enable Connected Apps
- Once logged in, go to “Setup Menu” (Gear Icon) and click “Setup”
- Search “External Client Apps” in the “Quick Find” search box
- In “External Client App Settings”, enable “Allow creation of connected apps”
- Click “New Connected App”
Step 3: Fill Basic App Information
-
Fill the necessary app details:
- Connected App Name: Your application name (e.g., your brand name)
- API Name: Auto-generated from app name (only letters, numbers, and underscores allowed)
- Contact Email: Your contact email for Salesforce support
- Contact Phone: Your contact phone for Salesforce support
- Logo Image URL: (Optional) HTTPS URL for your app logo (max 100 KB, preferably under 20 KB)
- Info URL: (Optional) Web page with more information about your app
- Description: (Optional) Up to 256 characters describing your app
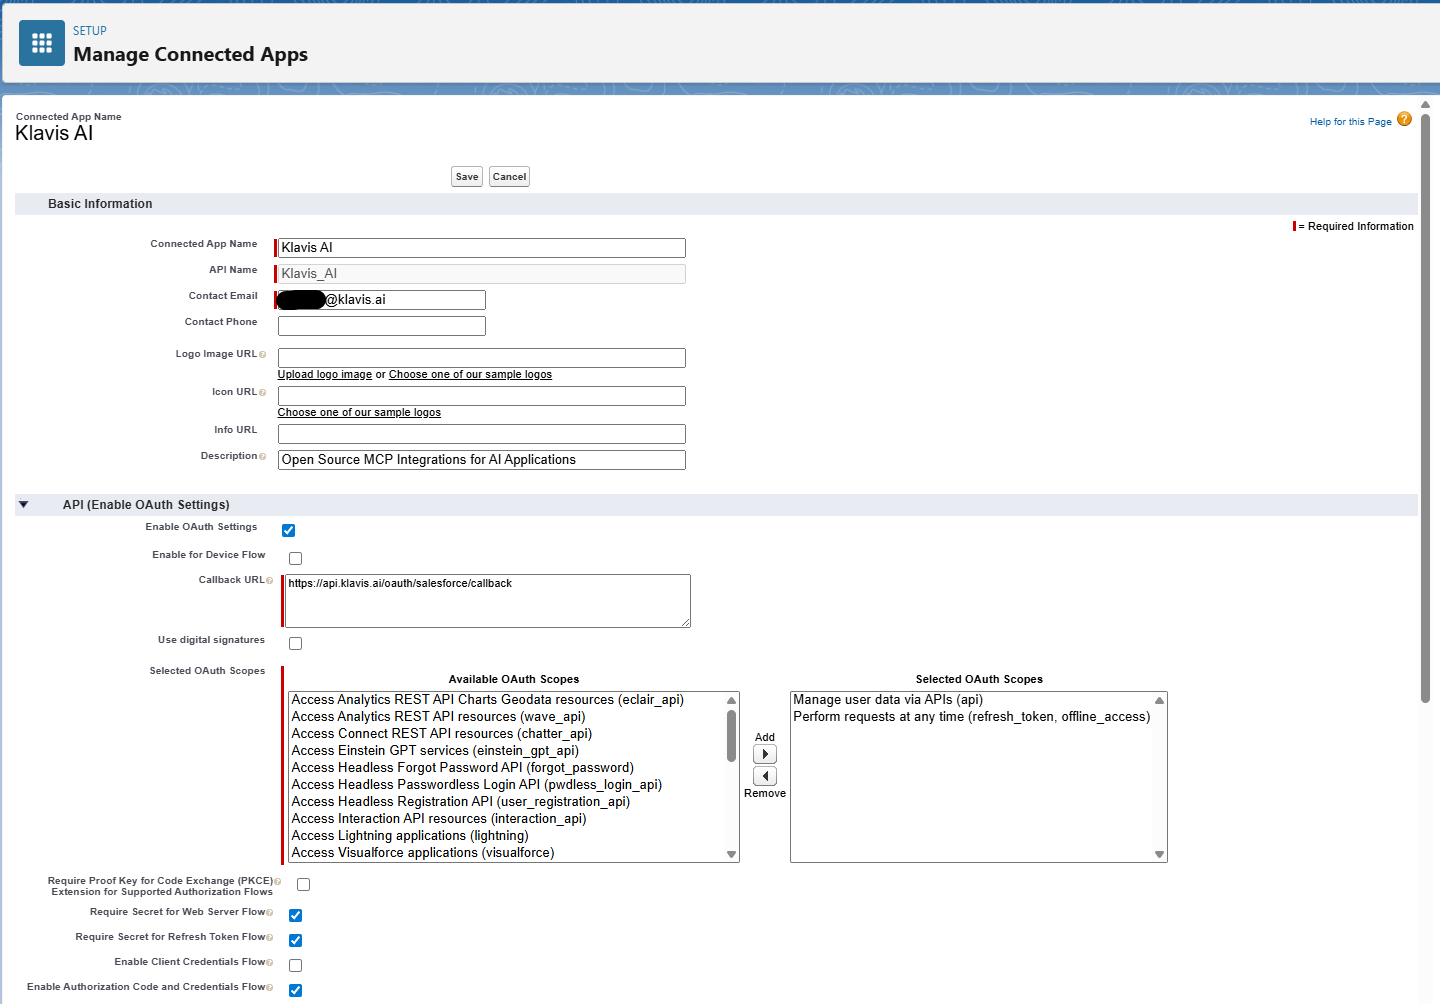
Klavis Salesforce MCP Server uses the following OAuth scopes:
api,refresh_token,offline_access-
In the API (Enable OAuth Settings) section:
- Select “Enable OAuth Settings”
- Callback URL: Enter
https://api.klavis.ai/oauth/salesforce/callback
-
Select OAuth Scopes: Move required scopes from “Available OAuth Scopes” to “Selected OAuth Scopes”:
Manage User Data via APIs (api)- required to manage user data via APIsPerform requests on your behalf at any time (refresh_token, offline_access)- required to perform requests at any time
-
Additional Settings:
- Enable “Require Secret for Web Server Flow” if your app can keep the client secret confidential
- Enable “Require Secret for Refresh Token Flow”
- Enable “Enable Authorization Code and Credentials Flow”
- Disable “Require PKCE Extension for Supported Authorization Flows”
- Click “Save” to create the app
Step 4: Get Consumer Key and Secret
After creating the app, follow these steps to get the credentials.- From dashboard, go to “Setup Menu” (Gear Icon) and click “Setup”
- Search “App Manager” in the “Quick Find” search box
- Find your connected app in the list and click the dropdown arrow, then select “View”

- In the API (Enable OAuth Settings) section, click “Manage Consumer Details”
- Verify your identity using the verification code sent to your email
- Copy the Consumer Key and Consumer Secret (keep them secure!)

(Optional) Step 5: White Labeling
White labeling allows you to customize the OAuth experience with your own branding instead of Klavis AI’s.
- Configure White Labeling: Go to https://www.klavis.ai/home/white-label
- Add Your Credentials: Enter your Salesforce Consumer Key and Consumer Secret from Step 5
-
Set Redirect URI: Use
https://api.klavis.ai/oauth/salesforce/callbackor your custom callback URL -
Initiate OAuth: Use your Client Id when starting the OAuth flow: